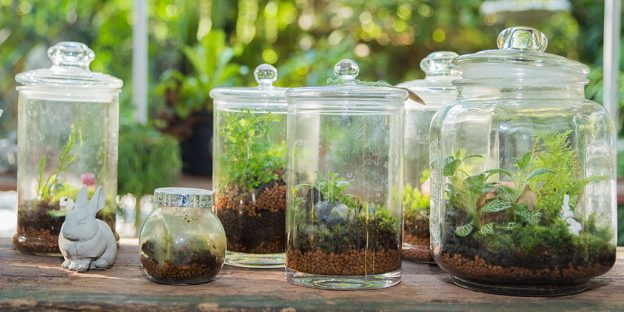
Terrariums Galore! How to bring the outdoors in

We recently hosted a terrarium building class at the Corner House. Now we’re passing our learnings on to you! Below, Rebecca Turk from Moore Botanical Gardens offers inspiration and guidance for making your own thriving terrarium gardens.
Growing plants indoors just makes a home feel complete. It freshens our air, provides mental happiness and brings life into the room. I absolutely LOVE terrariums. What once started as an interest years ago, quickly turned into a hobby and now an obsession. I have 32 terrariums between my home and office; no joke! I love how each has a different appearance, shape and creative accent for each room.
Interested in making one? Good! There are a few simple things you need to know about creating these living pieces of art. First, they are as cost effective as you would like them to be. The more intricate the container, the more expensive it is. Below is a run-down of everything you need.
Containers: All containers need to be CLEAR. Glass is preferred, but plastic works too. For starting out, I only recommend using traditional terrariums with lids. These have much less care involved than open (no lid) terrariums. Search for these at home good stores, antique stores, garage sales and online. Don’t forget to check the kitchen section!
Growing environment materials: Potting soil, plants, sphagnum moss (ground) and activated charcoal. All of these materials can be found at a home improvement store other than the activated charcoal. This ingredient is vital for the success of the terrarium since it keeps the air clean and filtered inside. This can be found at any pet store in the fish section or online. For plant selection, my favorites are begonias, ferns, moss and peperomias. Remember to plant small since they will grow up quickly!
Other materials: A spray bottle is needed for watering and decorations such as rocks, pebbles and figurines can personalize your terrarium.
Now it’s time to get started! Once all your materials are gathered in one area, follow the below step-by-step directions.
- Choose your plants. Make sure you consider the location where the terrarium will live.
- Place a layer of rocks or pebbles at the bottom, around ˝ to 1” thick. (Optional, only decorative)
- Place a thin layer of charcoal in the bottom of the jar. This does not need to cover the bottom of the terrarium solidly. Why charcoal? It prevents odors from forming in the terrarium. That wet, sulfur smell should never be present.
- Mix some potting soil with a little bit of the activated charcoal.
- Fill Ľ (roughly) of container with the charcoal/soil mix.
- Sprinkle some of the sphagnum moss on the top to just cover the surface.
- Plant your plants in the terrarium. Remember that these little guys will grow up quickly so leave some air space! If the mouth of the jar is narrow, tongs or tweezers may be needed.
- Fill in the sides with soil, firming the soil down around the plant.
- You can add any additional rocks, figures, etc. if you would like.
- Spray heavily with a spray bottle (initially only) or water very lightly under the sink.
- Clean off the sides of the jar to light can enter easily.
Care instructions
- Spray with water once a week to start. You do not need to spray extremely heavy. If your terrarium is in full sun, it may need more frequent spraying. If it’s in more shade, it may not need to be watered weekly.
- Trim any plants with dead leaves or spent flowers.
- Once the plants mature, you may need to remove them, propagate them or divide them.
- Try to divide and propagate as much as possible so you have free plants for more terrariums!
The most important thing to do is to have fun and enjoy the beauty of gardening. I hope you enjoy making terrariums just as much as I do!
/Rebecca Turk, Education and Events Manager, Moore Farms Botanical Garden


